jueves, 2 de febrero de 2017

Tablet as a virtual screen

How to connect your tablet as an auxiliary screen for drawing on desktop software.

Virtual Tablet

http://www.sunnysidesoft.com/virtualtablet/how-to/

https://play.google.com/store/apps/details?id=com.sunnysidesoft.VirtualTablet.lite
  1. Download and install VirtualTablet Server on your PC (May require reboot after installation).
  2. Run VirtualTablet Server on your PC.
  3. Run VirtualTablet on your tablet device with stylus pen and connect to the server.
  4. After connection established, move your pen around in tablet device. You will see the exact same movement in your PC. Enjoy drawing!


Slide

Slide transforms your phone into a fast and lightweight mouse input for your PC, and emulates the experience of a touch screen.

Visit the Slide home page to download the needed software and other resources:
http://www.slide-app.com

https://play.google.com/store/apps/details?id=com.j03.mobileinput


SketchBus

SketchBus turns your mobile device into a 3000$ drawing tablet.
SketchBus rocks a custom-made protocol specifically designed for drawing. It is fast, realtime & precise.
SketchBus is designed to work with any graphics app. Just link it to Photoshop, Gimp or anything else, use the tools you like, when it comes to drawing, you can sit back and enjoy a fluid drawing experience on SketchBus on your phone or tablet.
https://sketchb.us/


WiFi drawing tablet

Android App - http://bit.ly/29ny4n8
Drawing Tablet Server - http://bit.ly/29WpKbg


martes, 22 de noviembre de 2016

Cutout animation with OpenToonz

OpenToonz Character Animation Tutorial: Plastictool & Medibang Paint for Cutouts


In this OpenToonz tutorial Jay AnAm combines 2 methods for 2d character animations: Plastictool for mesh animation and adding images on levels above for cutout animations. I painted all images with the free painting tool Medibang Paint Pro.

https://www.youtube.com/watch?v=oSe2iDnoK10

lunes, 21 de noviembre de 2016

2D Spine Animation in Blender

Cutout Animation Tools

(Blender Add-on)

https://github.com/ndee85/coa_tools

The Cutout Animation Tools (COA Tools) Addon for blender is a 2D rigging and animation suite. It offers you similar tools as for example programs like Spine or Spriter. COA Tools offer you a rapid workflow to create 2D Cutout Character/Animations in blender. Thanks to blenders great animation system and and this addon you get a powerfull solution to create 2D animations. 
It is parted into 3 different components:
  • Photoshop sprite exporter
  • Blender Addon
  • Godot importer
  • (plus) Godot Cutout Animation Importer

discussion and example files:


workflow:


mesh triangulation:


jueves, 17 de noviembre de 2016

Rotoscope on Android

HCI-rotoscope-android

It's a rotoscoping application developed for Android. The apk is available on http://share.dralagen.fr/rotoscope.apk


Flipbook animation on Android


Flipbook animation on Android

Flipbook drawing: FlippaClip

https://play.google.com/store/apps/details?id=com.vblast.flipaclip&hl=en


• Onion Layers (Shows before and *after frames as ghost images)
• Drawing Layers
• Animation timeline
• Frames manager
• Drawing tools
• Text tool
• Build animation videos 
• Share animation videos through (YouTube, Facebook, Vine, Instagram) 
• Pressure sensitive pen support
• Samsung Spen support

 Paid feature


From FlippaClip to Medibang Paint

https://www.youtube.com/watch?v=mqyJS32dJrg


MediBang Paint

https://medibangpaint.com/en/

Windows/ Mac/ iPad/ iPhone/ Android
Draw or make comics on practically any device!!

MediBang Paint is a FREE lightweight digital painting and comic creation program that comes loaded with brushes, fonts, pre-made backgrounds, and other resources.


lunes, 14 de noviembre de 2016

Rotoscope with Krita

Rotoscope with Krita

Using Krita's new Animation features to draw on video footage.


Rotoscoping is an animation technique used by animators to trace over motion picture footage, frame by frame, when realistic action is required. Originally, photographed live-action movie images were projected onto a glass panel and re-drawn by an animator. This projection equipment is referred to as a Rotoscope. Although this device was eventually replaced by computers, the process is still referred to as Rotoscoping.https://en.wikipedia.org/wiki/Rotoscoping


We must first prepare the video sequence, selecting and exporting the frames as numbered bitmaps.
We can achieve this in any video editor, Vegas, Premiere... We'll do it here in Shotcut, a LibreGraphics alternative
.

Shotcut:

Add video. Mark In & Out. Export frames as JPEG on the Encode panel.


Now we have a folder full of numbered still frames.


Krita:


Create a new empty project, using the Custom Document option.
Choose a video format as picture size, as Full HD (1920x1080), HD (1280x720), PAL (768x576)... Set Resolution at 72dpi as it is an image for the screen.
You can save this as a template for future use.


Set Krita's workspace to Animation, using the Workspace Switcher button in the upper right corner. That mode opens a Timeline docker and an Animation & Onion Skin docker.


Import frames as animation: "File/Import animation frames/Add images"
Choose the first one and shift-click on the last one.


Add layer and give it a name.
Mark layer as Animation by right-clicking on the first frame and adding a New Frame.
A light bulb icon marks the layer as an animation layer.


Right clik on the "video" layer and adjust the opacity to 40% or so, to dim the back image.


Draw on this cell, and add a New Frame. Repeat.


You can add a keyframe every 2 or 3 or 4 frames, they stay active for the normal frames.
So you have a 2s or 3s animation.


You can change the background layer: fill it with color, a gradient or any drawing or photo. Switch off the video layer to see just the drawing.


We are not using the Onion Skin option, as we are drawing over the video image. If we want to use Onion Skin in order to check for the evolution of drawings along time, activate the "bulb" icon in the corresponding layer.

Play the animation using the player controls. You can play a small section by clicking on the first frame and shift-clicking on the las frame of the desired loop.
When finished drawing all the frames, we want to produce a final video:
Export all the frames as numbered stills, with "File/Export animation".


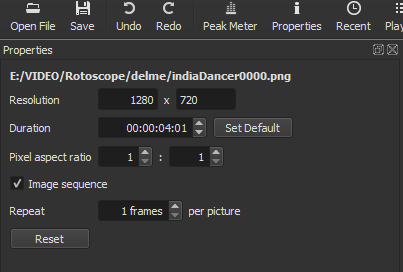
Import the frames in Shotcut as sequence. Open File, open the first frame (name0000.png), click on Properties and activate the Image Sequence tick.


Drag the clip to the Timeline, and Encode to the desired output format (ie: H.264).
Now we have a finished video with our rotoscope.


- : - 


Krita Animation Manual
https://userbase.kde.org/Krita/Manual/Animation


- : - 

The Rotoscope technique was invented by Max Fleischer in 1915, and used in his groundbreaking Out of the Inkwellanimated series (1918-1927)https://en.wikipedia.org/wiki/Rotoscoping